Charities, non-profits, and other good causes in the Channel Islands can register your-charity-name.org.je and .org.gg domains for free with Island Networks in Alderney. It is a great program and I’ve used it repeatedly, but there are a couple more steps where I fear charities give up, since they appear complicated. I aim to explain the entire process in a way which at least one volunteer at any C.I. charity will be able to follow. Which volunteer, you wonder? You. Let’s get started.
The plan is to have Islanders visit your-charity-name.org.je and find a website, without requiring you purchase anything.
To have a website you need three basic things. A domain name, DNS hosting, and web hosting. Purchased domain names include DNS hosting, but free ones from Island Networks do not. DNS is just the background service which connects your website name with an IP address where the site will be hosted. Don’t worry if none of that makes sense, just keep going forward. You don’t need to be an expert to sort this out.
An executive summary of the process is this: Register a free domain name with Island Networks, configure free DNS service from DigitalOcean, and create a free website on Tumblr, then connect everything together seamlessly. It isn’t difficult and won’t take long. Plan on spending about 20 minutes setting up your name, then an hour or so creating a simple website, then about one working day waiting for everything to come together.
Step One - Confirm the name you want is available
No point in moving on to step two if your preferred name is taken, is there? Go to this page on Island Networks’ channelisles.net site and enter the name you want. Leave off the http://www bit, you don’t need it. For example, if your charity is “Sharks with Lasers” type sharkswithlasers.org.je. You should see the message “Domain not found” like shown above. If you see details of a domain owner try a different name until you find one not taken (and if sharkswithlasers.org.je is ever taken, watch out).
Step Two - Register it for free

Start the application process from this page on channelisles.net, entering whichever name you chose. Leave off the www and make sure you choose .org.je (or .org.gg) like shown above, then select the Continue button.
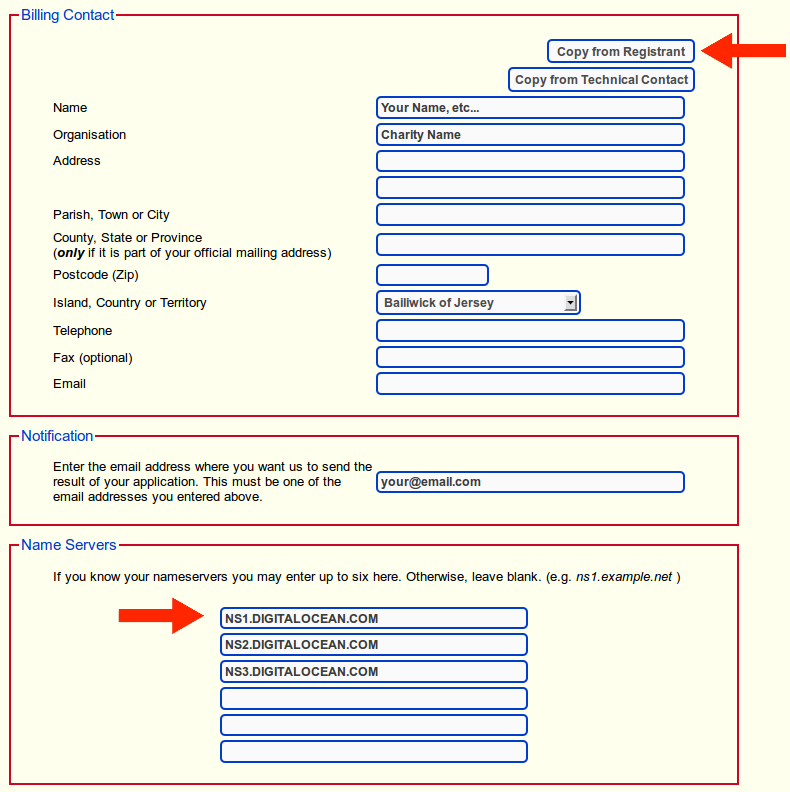
Next is a simple registration form. Enter your details and use the “Copy from Registrant” button to save typing them repeatedly. All the contact sections should match. Pick a notification email, then on to the Name Servers section.
You can source your DNS Name Servers from a number of places, but for this tutorial I am using a company called DigitalOcean. They currently offer free DNS hosting and have a very simple and easy to use website. To use them, we tell Island Networks to use DigitalOcean’s Name Servers NS1.DIGITALOCEAN.COM, NS2.DIGITALOCEAN.COM, and NS3.DIGITALOCEAN.COM, like shown below.
After entering these values read the agreement at the bottom of the page and select “I accept the agreement” to continue. At this point you are done with the Island Networks website. You can ignore any billing steps, just close your browser. Next, check your email inbox and reply to the confirmation message they send. Tell them you are a charity and ask them to waive your fees. They will usually email back within 24 hours with confirmation and the domain is now yours.
Step 3 - Set up DNS
You can do this step right away, you don’t need to wait for Island Networks to finish processing your application. Go to DigitalOcean’s registration page and sign up. All you need is a valid email address and a password. Easy. You are taken to the simple management page shown below where you will make a couple changes.
- Select DNS from the vertical menu on the left. Then press the large ‘Add Domain’ button up top.
- Next, enter your domain name then enter Tumblr’s IP address 66.6.44.4 and click the giant green ‘CREATE DOMAIN’ button.
- Last, you want to make sure your name works both with and without the www so choose Add Record and select record type CNAME, then enter “www” and “domains.tumblr.com.”. Be sure you include that trailing
., so it has one just like the three NS records do. Save and done.
Your DNS page should look like the last step above, with the only difference being the domain name isn’t charity.org.je of course. All done here, log out of DigitalOcean.
Step 4 - Make a website on Tumblr and point it at your domain name
The registration processing time from step 1 takes a day or two, which leaves you plenty of time to create an account at Tumblr and make a simple website. Be sure to check your email for the confirmation link from Tumblr. The option to use a custom domain does not appear until you have verified your email address with Tumblr.
How your site looks is a matter of personal preference and beyond the scope of this post, but just dive in and create something. It really is easy if you have a few photos and a few lines of text to describe your organisation. You don’t need a big fancy site for your first attempt. Keep it to one page. Most people just want to find you online and have a way to contact your charity.
Once you’ve created the blog page on Tumblr, it’s time to make it your main website. As an example, I’ve re-done the Amnesty International Jersey Group’s page. The new site is at amnestyjersey.tumblr.com, which I want to move to the main amnesty.org.je address.

- Click the gear icon on the toolbar.
- Select your Tumblr blog on the left.
- Type your website’s domain name. Leave off the www, you don’t need it.
- Save.
Ignore the “…could not be verified” error for now, this is expected. We are doing several steps in advance to keep everything simple and they all don’t need to complete in a set order.
Step 5 - Done, now just wait to hear back from Island Networks in a day or two.
Have a cup of tea, read a book, whatever. From now on, you update your website via the Tumblr Dashboard login page. Changes you make there automatically appear on your site (Your Tumblr blog page and your main website are now one and the same).
Once Island Networks write you back with the application approval you probably need to wait another hour or two for the DNS changes to take effect. You already set everything correctly, just try visiting your main website periodically and you will find it soon works perfectly.
Well done!