The Turris Omnia is a very capable piece of hardware but the official documentation is sparse. This blog post will explain how to install the ad-blocking software package Pi-hole inside an Ubuntu 16.04 (Xenial) Linux container, which runs on your Turris Omnia router.
The advantage to doing things this way is that you do not need any extra hardware, such as a Raspberry Pi, and you block all ad-serving domains at the router. That means every device using your connection will be automatically protected from malicious content distributed by ad networks.
If you use Firefox with NoScript, Pi-hole will trigger Application Boundaries Enforcer (ABE) errors. These can become annoying after a while, so we’ll fix that too.
Step One - Create an Ubuntu container
A note about memory types before beginning — the Omnia has 8GB of internal flash memory and while it is technically possible to install the Ubuntu container onto that, internal flash memory wears out and is not well suited for our purposes, plus you risk greatly shortening its life expectancy. It is soldered to the main board and not easily replaceable. You should definitely install a Mini-SATA (mSATA) drive inside the Omnia and install LXC containers onto that instead. Small mSATA drives are inexpensive and are easy to replace.
You must use SSH to connect to the router and manage the Ubuntu instance, so read this overview if you are not already familiar with SSH basics.
You can create Linux containers from the GUI, but you still need to configure yours using SSH so let’s do as much as possible that way first. SSH to your Omnia to start. By default it assigns itself the IP address 192.168.1.1. The password is whatever you set when you first configured the router (not the ‘Foris Configuration Interface’, the password you use for ‘LuCI’).
ssh root@192.168.1.1Now download and create the Ubuntu container and give it the name ‘pi-hole’. After running this command you will see several dialogues asking for your selection. Follow the prompts to select Ubuntu 16.04, this bit is easy and is self-explanatory.
lxc-create -t download -n pi-holeAfter creating the Ubuntu container, configure it to automatically start at boot by editing a file on the Omnia (opkg update && opkg install nano if Nano is not already installed).
nano /etc/config/lxc-autoCopy and paste the following three lines into that file:
config container
  option name pi-hole
  option timeout 60
Step Two - Configure the Ubuntu Pi-hole container
You may be used to managing Ubuntu instances by SSH’ing into them directly, however this is a container and it is much simpler to use the lxc-attach command to control it. Note that if you prefer to SSH directly to the pi-hole container without first connecting via SSH to the Omnia, you must configure an alternate port because port 22 is already reserved for the Omnia. I don’t think it is worth the extra effort.
Start the Ubuntu Pi-hole container.
lxc-start -n pi-holeAttach the Ubuntu Pi-hole container.
lxc-attach -n pi-holeYou are now logged in as root in your Ubuntu Pi-hole container. Install some necessary software packages next. Remember this is the ARM version of Ubuntu, and it lacks some packages which are present in the standard 64-bit version most people use. Here I include nano for editing text, but if you prefer a different editor then substitute its package name instead.
apt install nano curl ca-certificatesI recommend you enable the unattended-upgrades package as well, which will automatically download and install all official Ubuntu security updates as they are released. Follow the prompts and accept the default choices offered.
apt -y install unattended-upgrades && dpkg-reconfigure unattended-upgradesThe Pi-hole package isn’t installed just yet but you can make a couple more configuration changes to make using it easier. Set a bash ‘alias’, so that when you type pihole the command /usr/local/bin/pihole is executed — much easier to remember. Then you can use all the commands in their documentation.
echo "alias pihole='/usr/local/bin/pihole'" >> ~/.bash_aliases && source ~/.bash_aliasesNext you should configure cron to automatically update Pi-hole once a week. Open the crontab file for editing.
crontab -eNow paste this line and remember cron requires a newline character after each command otherwise cron won’t execute it. Just paste the command into the crontab file, and press <ENTER> with your cursor at the end of the line so it moves down to the next line.
@weekly /usr/local/bin/pihole -up
Last (and optional) is to change the Ubuntu container’s hostname. Mine was assigned the name ‘LXC_NAME’ by default, so I edited these two files and changed ‘LXC_NAME’ to ‘pi-hole’.
nano /etc/hosts /etc/hostnameNot super important but that’s how it is done.
Step Three - Install Pi-hole

From the Pi-hole website, the install command is provided. If you wish to review their code before running it then do so now.
curl -sSL https://install.pi-hole.net | bashFollow the prompts and review the choices offered, which are all safe defaults. I selected OpenDNS as my upstream provider, but you can use any one you like.
After the install script completes, a message will display the management interface address and your admin password for logging in to the Pi-hole web interface. It also displays your Ubuntu container’s IP address which you need later, so make a note of this. After installing, you are able to perform many common functions in the Pi-hole web interface and you do not need to continue using SSH.
Step Four - Configure your Turris Omnia
The Omnia uses the Knot DNS resolver by default. Pi-hole works by intercepting DNS requests for ad-serving domains and returning blank pages, so you will disable Knot and override a couple default settings. This means your Omnia will no longer use DNSSEC, however this is an acceptable trade-off when you compare the risk of malware distributed via ad networks versus the far less common threat of DNS spoofing.
The next configuration changes you need to make are in the Omnia’s LuCI interface, so open your web browser and log in to http://192.168.1.1/cgi-bin/luci for this part.
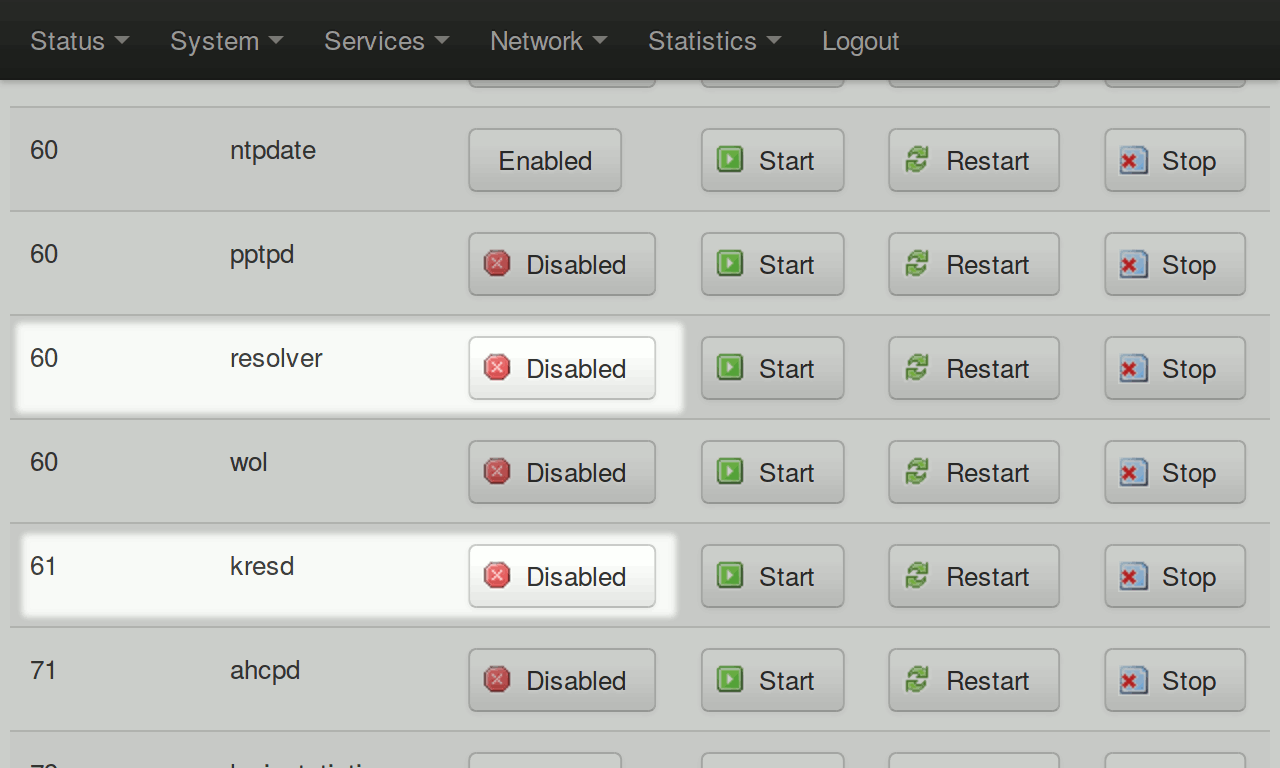
Now visit http://192.168.1.1/cgi-bin/luci/admin/system/startup (or select System > Startup from the menu). Scroll down, find ‘resolver’ and ‘kresd’, and stop and disable both services.
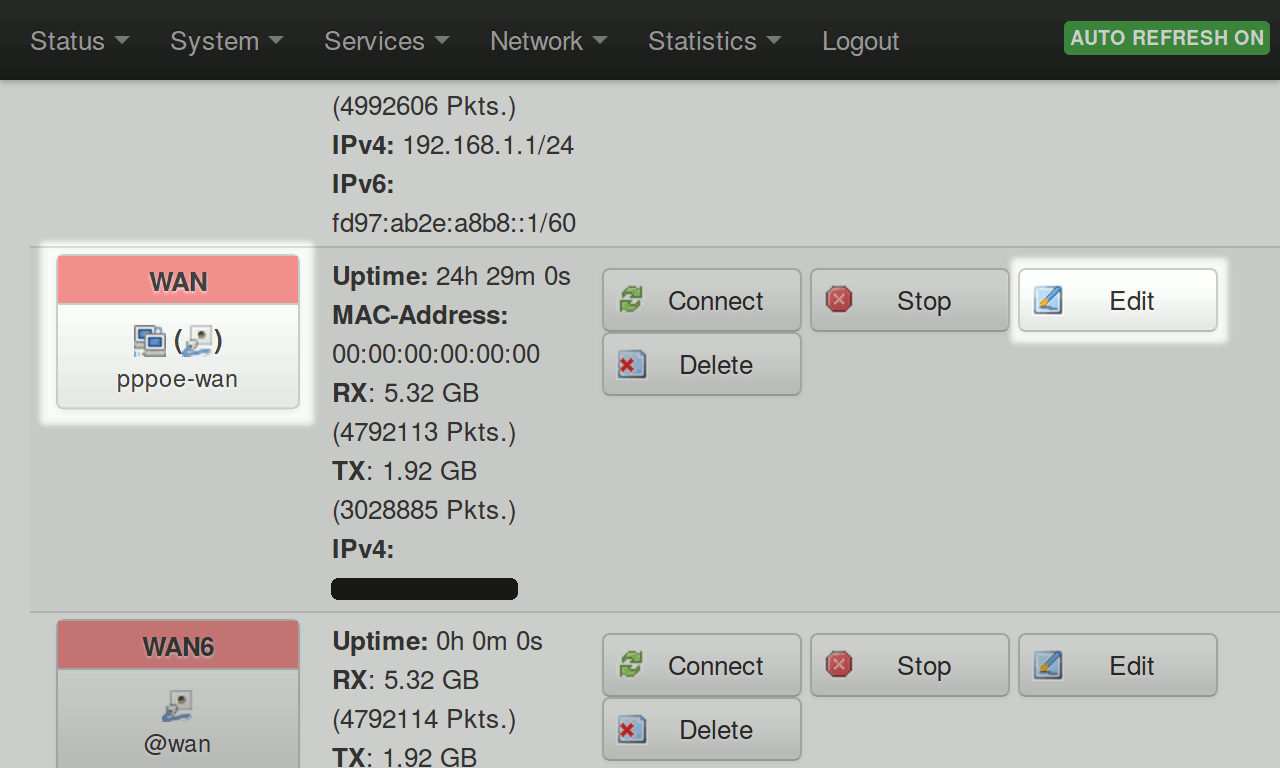
Next visit http://192.168.1.1/cgi-bin/luci/admin/network/network (or select Network > Interfaces from the menu) and click on the ‘Edit’ button in the WAN section
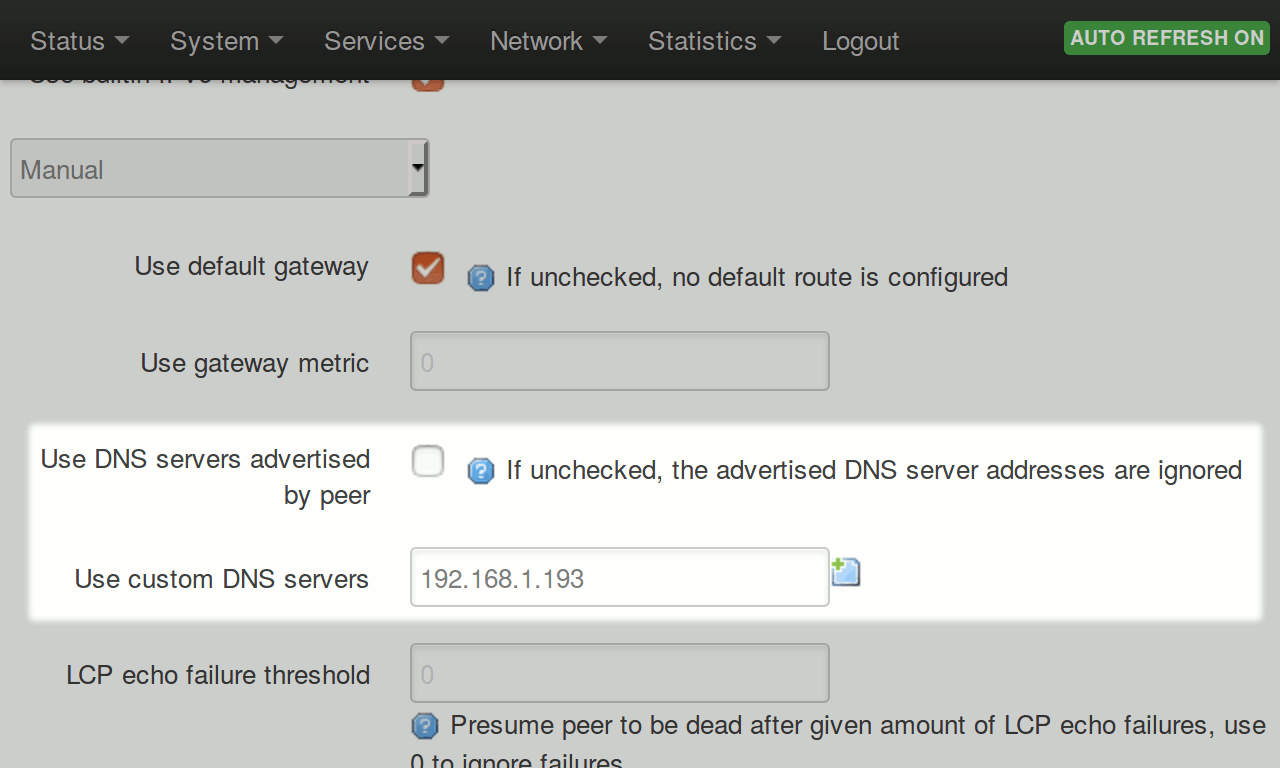
Next select the ‘Advanced Settings’ tab and uncheck ‘Use DNS servers advertised by peer’. Enter your Ubuntu container’s IP address in the ‘Use custom DNS servers’ field that appears. It was displayed with the Pi-hole login info (alternatively you can use lxc-info -n pi-hole | grep IP in the SSH connection to your router - not the Ubuntu SSH but the Omnia session).
Save & apply the changes you made so far.
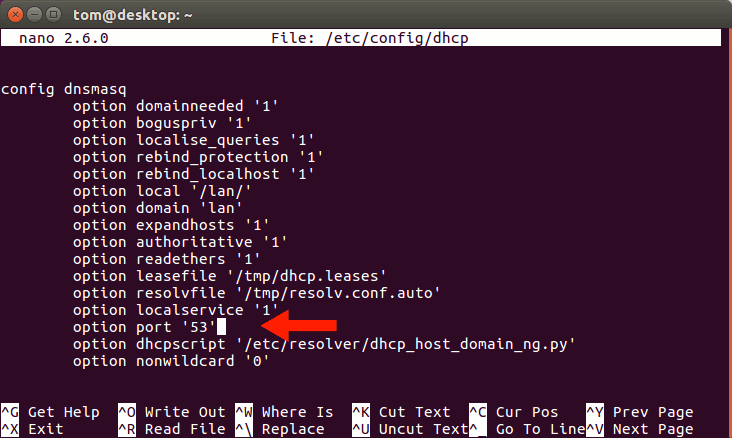
The last step is to switch back to your SSH session. If you are still logged in to the Ubuntu container type exit to switch back to the Omnia and open one last config file for editing.
nano /etc/config/dhcpIn the first section find the line ‘option port’ and change the default value from ‘0’ to ‘53’. Save and exit.
Update 18th Jan 2018: Depending on your settings, the Omnia may update and re-enable the Knot DNS resolver without warning you that this will break connectivity, so one last step is required. According to the updater documentation, you must create a new config file to override this unwanted behavior. Easy enough, this one-liner will do it:
echo 'Uninstall("knot-resolver", { priority = 60 })' >> /etc/updater/conf.d/user.luaNow restart your Omnia and you are done. No more ads.
Using NoScript?
If you use Firefox with the NoScript extension, you will occasionally see error messages for ‘ABE’, NoScript’s Application Boundaries Enforcer. Normally when another device on your local network intercepts DNS queries and returns HTML content this means something has gone wrong, but since this is the expected behavior from Pi-hole (and the Omnia and Ubuntu container are trusted) you can make an exception to the default block setting.
Switch back to Firefox and open NoScript’s settings. Go to Advanced > ABE and select SYSTEM (on the left). The third line reads ‘Accept from LOCAL’. Append your Ubuntu container’s IP address here to whitelist it. For example, if your Pi-hole instance/Ubuntu container is at the IP address 192.168.2.2 the edited line would be ‘Accept from LOCAL 192.168.2.2’.
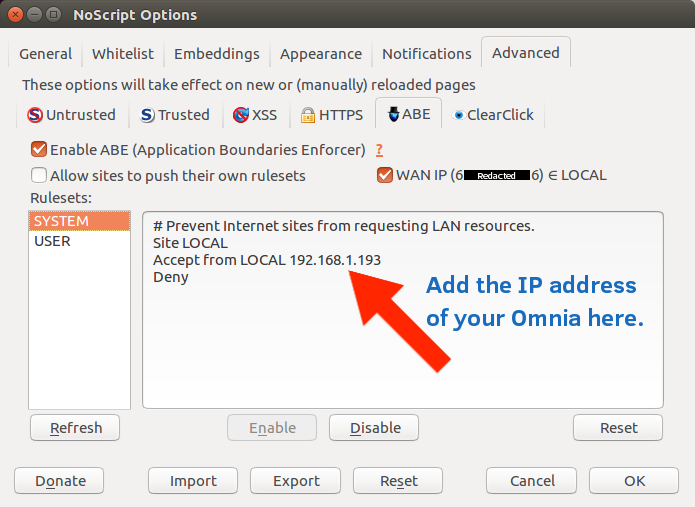
Settings are automatically saved after editing, so just close the NoScript settings window and you should not see any more ABE errors resulting from Pi-hole. You may still see occasional ABE errors, but those will be from other websites or services which may or may not also need whitelisting.
Special thanks to Nick Busey, whose now deleted but still available on archive.org blog post explained the final tricky parts to putting this all together and making it work correctly.