Firefox uses profiles to store all your preferences, add-ons, and user data. Most people just use the default one, but with so many people working from home during the current health crisis this is a good time to explain how to add a second profile for work tasks.
You can manage Firefox profiles while it is already running by visiting about:profiles or using an add-on, but adding them to the Ubuntu dock’s menu in the left sidebar gives you better usability (try about:about to see all the about: pages, there are many).
Add a new Firefox profile
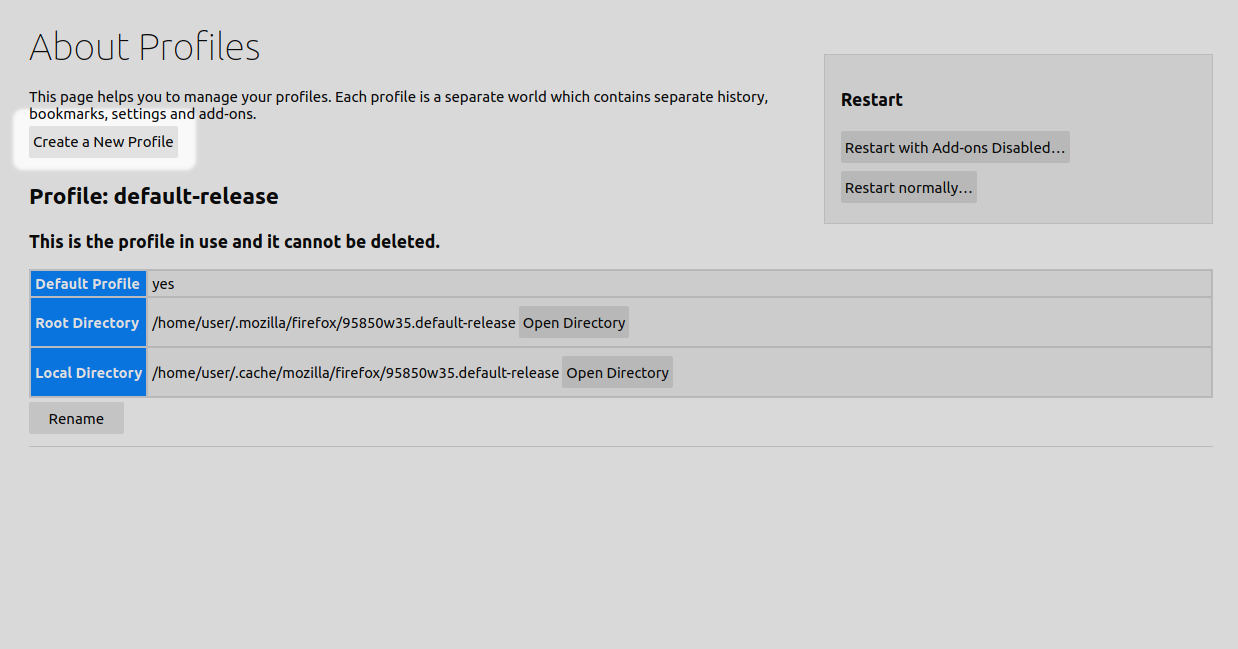
Type about:profiles in the address bar to start Firefox’s Profile Manager. You probably have two already because Firefox 67+ uses a dedicated profile for each update channel and on a fresh default Ubuntu 20.04 install two profiles named “default-release” and “default” already exist. The profile named default-release is the default actually in use and you can safely remove the profile named “default” because the name is confusing.
When you click the “Remove” button to get rid of it you are offered the option to keep the directory if you aren’t 100% certain.
Now click the grey “Create a New Profile” button and follow the Create Profile Wizard. Name it whatever you like, but for this example I’ve simply named it “work”. In testing I had problems with names using spaces or hyphens (such as “work-from-home”) so keep it short and simple.
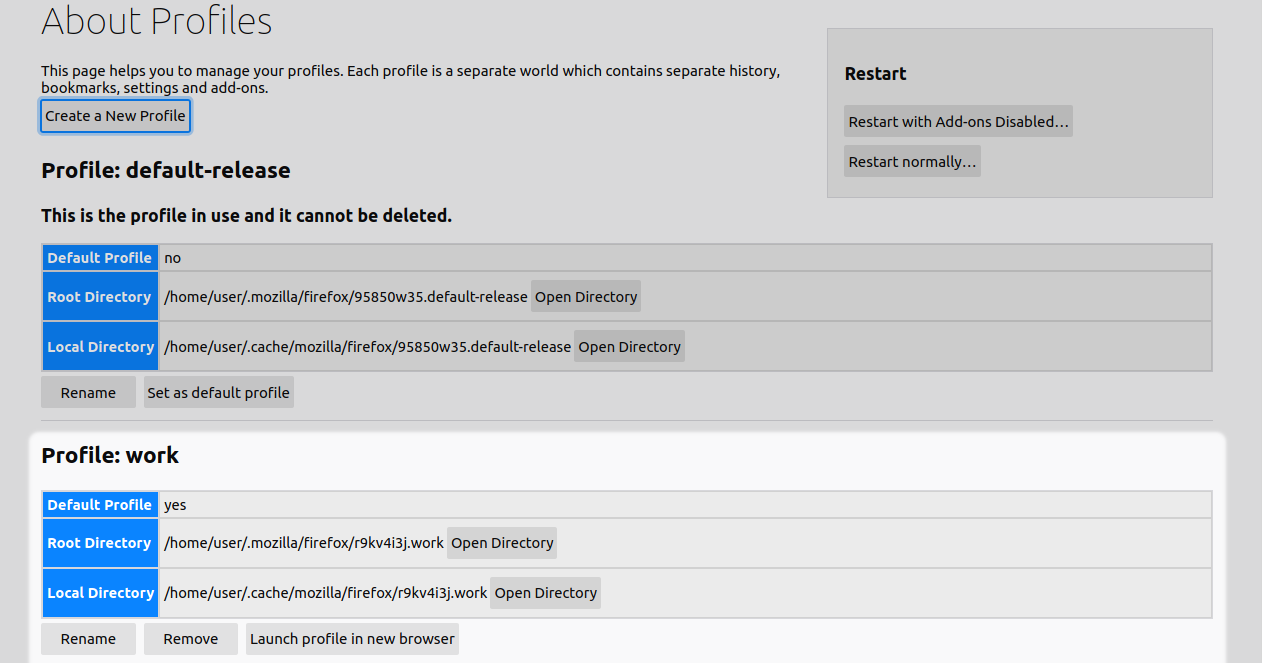
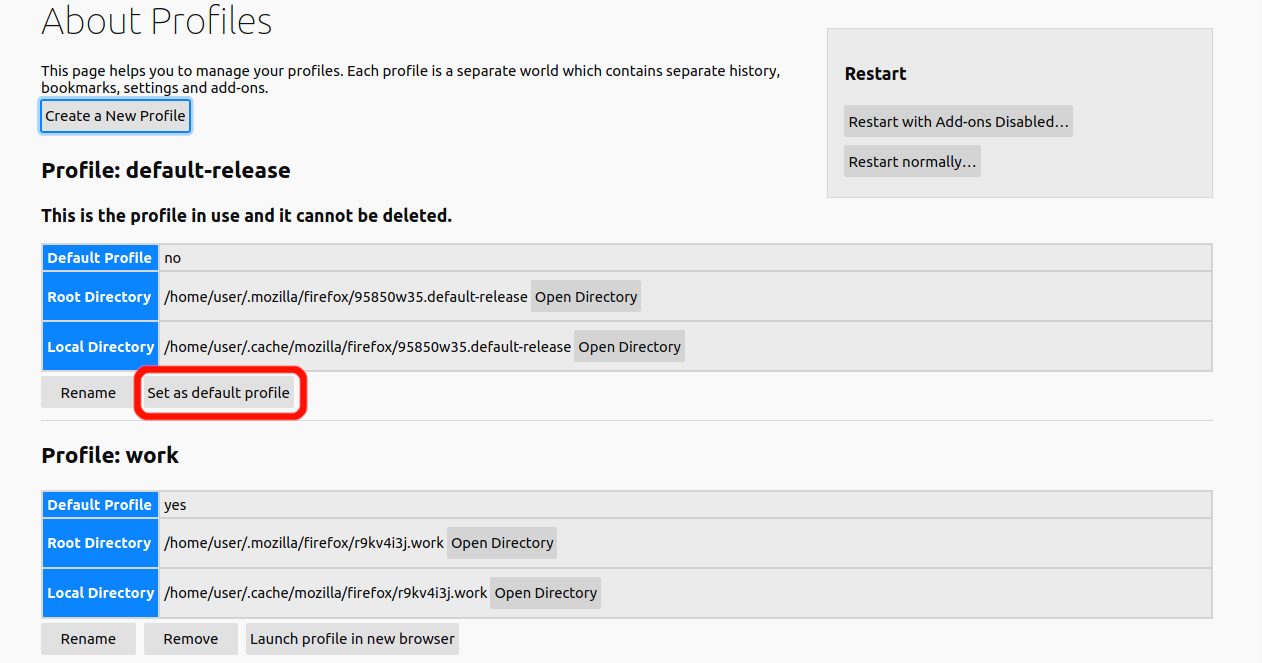
One thing to highlight here before continuing, is that when you create the new profile it becomes the default profile. That probably is not what you want so click the “Set as default profile” button under the “default-release” profile to reverse the changed setting.
Customize the Dash menu
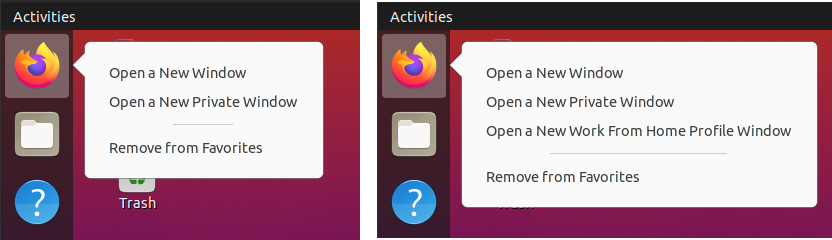
Now that you have the second profile ready, let’s add it directly to the Dash menu, so you can choose which profile to launch. Even if an instance of Firefox is already running, you can launch a second or third with each using different profiles. This should also work perfectly on Ubuntu 18.04 Bionic Beaver and later, as well as recent versions of GNOME Shell.
First, copy Firefox’s existing system launcher to a special user directory for custom launchers. Open a Terminal window and execute the following command.
cp /usr/share/applications/firefox.desktop ~/.local/share/applications/
Now open that new file for editing. Use gedit or which ever text editor you prefer. The file contains many lines with translations for different languages (such as “Name[ar]=متصفح الويب فَيَرفُكْس”).
You may leave these as-is or remove them to make the file smaller. For clarity, here is the default Firefox .desktop file with all its translation lines removed:
[Desktop Entry]
Version=1.0
Name=Firefox Web Browser
Comment=Browse the World Wide Web
GenericName=Web Browser
Keywords=Internet;WWW;Browser;Web;Explorer
Exec=firefox %u
Terminal=false
X-MultipleArgs=false
Type=Application
Icon=firefox
Categories=GNOME;GTK;Network;WebBrowser;
MimeType=text/html;text/xml;application/xhtml+xml;application/xml;application/rss+xml;application/rdf+xml;image/gif;image/jpeg;image/png;x-scheme-handler/http;x-scheme-handler/https;x-scheme-handler/ftp;x-scheme-handler/chrome;video/webm;application/x-xpinstall;
StartupNotify=true
Actions=new-window;new-private-window;

[Desktop Action new-window]
Name=Open a New Window
Exec=firefox -new-window

[Desktop Action new-private-window]
Name=Open a New Private Window
Exec=firefox -private-window
To add a menu item that launches the new profile, you only make two changes to this file. Edit the “Actions” line at the end of the first section to include the name of your new menu action, and then add that action below (or in place of) the existing sections.
Here is the newly edited Firefox .desktop file with the “work” profile added:
[Desktop Entry]
Version=1.0
Name=Firefox Web Browser
Comment=Browse the World Wide Web
GenericName=Web Browser
Keywords=Internet;WWW;Browser;Web;Explorer
Exec=firefox %u
Terminal=false
X-MultipleArgs=false
Type=Application
Icon=firefox
Categories=GNOME;GTK;Network;WebBrowser;
MimeType=text/html;text/xml;application/xhtml+xml;application/xml;application/rss+xml;application/rdf+xml;image/gif;image/jpeg;image/png;x-scheme-handler/http;x-scheme-handler/https;x-scheme-handler/ftp;x-scheme-handler/chrome;video/webm;application/x-xpinstall;
StartupNotify=true
Actions=new-window;new-private-window;work-from-home-profile;

[Desktop Action new-window]
Name=Open a New Window
Exec=firefox -new-window

[Desktop Action new-private-window]
Name=Open a New Private Window
Exec=firefox -private-window

[Desktop Action work-from-home-profile]
Name=Open a New Work From Home Profile Window
Exec=firefox -P work -no-remote %u
The last three lines are the new Dash menu item. the -P work argument launches Firefox with the named profile and the -no-remote argument opens a new Firefox instance.
Final Steps
To see the changes you must log out and log in again, or restart the computer.
One thing I found helpful was to add a theme to the new profile, to make the different profiles more obvious. You can now set up the new profile with different add-ons, and change each ones settings and bookmarks.
If you would like a third or fourth profile, simply repeat the above steps to add them.